
=^_^= Please Note: Freshly updated 4/2014. I hope you enjoy this tutorial and it helps you install zippers into a cardigan style sweater that has been pre-felted or knit with a finished edge!
-------------------------------
Welcome to my very first online tutorial! I'm very excited about showing you the easiest way to install a zipper into a felted garment, or a garment made of heavy fabric. This method is best used for sweaters and jackets, and may not be appropriate for sewing zippers into lightweight garments, or ones requiring facing and linings. Please note: I developed this method myself, after several extremely frustrating years of sewing zippers into clothing, while following the manufacturers instructions. When I began sewing felted wool, I needed a better method, and developed this after starting to work with a sewing glue called Liquid Stitch.
My example that I'm working with here is a felted wool sweater, that I am going to place a separating zipper down the middle front, thus turning a pullover into a cardigan. This sweater has already been "felted" or prewashed, and the wool has completely shrunk, though you can still see the knit stitch detail. It's important to note that once you shrink, or "felt" wool, all the fibers become interlocked, so you can cut the wool and it won't unravel. Please note, after two cycles through my washer and dryer, this sweater shrunk from a woman's size Small to a child's size 2-3! The wool is now very thick and full, and the sweater is now like a coat. It's usually this result that deserves a zip front.
Ready? Here goes!
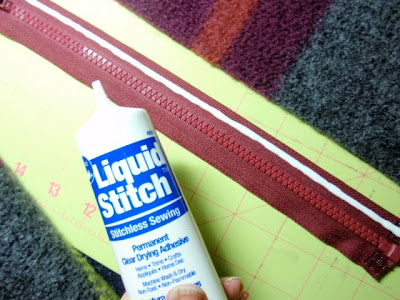
Gather the necessary materials together. Here's what I have on hand:
Gather the necessary materials together. Here's what I have on hand:
- A felted sweater, or one that will not unravel once I cut the front of the sweater open
- A "Separating" style zipper that you will use to sew into the sweater front, at least as long as the front vertical measurement of the sweater.
- A self-healing cutting mat, approximately 12" x 18" in size
- A rotary style cutter with a sharp blade
- A plastic see-through ruler that works with the rotary cutter
- Straight pins
- Liquid Stitch sewing glue (can be purchased at Jo-Ann's stores, or any similar sewing/crafting store)
- Measuring tape
- Sharp scissors
- Needle and thread in a color complimentary to the zipper
The first step is carefully measuring across the front of the sweater and determining the 1/2 way point, and where to cut for the zipper opening. The key words here are: "measure" + "carefully".

Measure across the front of the sweater in several different areas, approximately 3" apart, and pin at the 1/2 way mark, which will be the cutting line. Place a self healing type of cutting mat between the front and back of the sweater, inside the sweater. Using a rotary cutter and a straight edge, cut the opening. **Please do not put your cutting mat under the whole sweater, because you will most likely cut through the front AND the back of the sweater. That would cause some distress...
Also, please note: If you are working with an UN-felted sweater, cutting the sweater apart will mean your sweater will begin to unravel at the cut line. I DO NOT advise using this method on any sort of sweater that may unravel.
Also, please note: If you are working with an UN-felted sweater, cutting the sweater apart will mean your sweater will begin to unravel at the cut line. I DO NOT advise using this method on any sort of sweater that may unravel.

Now you will want to get your zipper ready for the installation. Rarely do I find a zipper that's the exact length I need. You will need to buy a longer zipper, and cut it down to fit your garment. First determine where you want the top of the zipper to stop. In my example, I've determined I want to put a button at the top of the neckline, so the zipper will be set about 3/4" down from the top of the neck edge.

Next, cut off the top portion of the zipper edges, about 1" longer than what you actually need. You will need to reinforce the stop areas (where the zipper will come to a stop at the top of the garment).
 Sew in the reinforcement zipper stops on each side of the zipper with needle and thread, in a color that preferably matches the zipper. You will be sewing in between two zipper teeth just above the point where you want the zipper to stop. You will want to sew around these teeth several times to make sure the zipper can't zip past this point.
Next, you will cut that extra additional zipper material away. I start by cutting the fabric area about 1/2" above the sewn area. I cut straight across to the teeth, then turn 90 degrees, cut along the teeth, and turn another 90 degrees and cut across the teeth ONE TOOTH away from where I just sewed. The extra fabric will be folded under when you sew in the zipper. Repeat this for the other side of the zipper.

Now your zipper is all ready to be set into the sweater.

Using the Liquid Stitch glue (which can be found at JoAnn's, or your local sewing store), place a bead of glue down the middle of one side of the zipper. It will be much easier if you start with your zipper closed...
Now, you will carefully - there's that word again! - repeat, c a r e f u l l y lay your first side of the sweater down over the glued line. The cut edge of the sweater should line up about 1/16" from the zip. Pin this in place by pinning straight down into the sweater. **NOTE: I do this step on top of my ironing board so the pins go through the sweater and into the ironing board, and I can get a good strong even glue clamp.
NOTE: If your sweater material is thin, use a small bead of glue. You DO NOT want the glue to be so thick that it seeps through the material of the sweater to the front of the sweater. If that happens, I suggest you pull the sweater away from the zipper before the glue dries, and carefully wash the glue out of the sweater and the zipper. Set the sweater and zipper aside to dry fully, and then start all over again, remembering to use a thinner bead of glue next time.
Do one side at a time. There's NO RUSH with this step. If you get glue on the sweater, use a little water and wash it off before it dries, and it's as good as new. Once you are happy with the first side, then go onto the second. If you have a pattern on the sweater, make sure to line up the pattern during the gluing. Once the glue dries, it's stuck for good!

Since I am adding a button at the top of the sweater, I am installing a button loop now. With a bit of the Liquid Stitch, I push the loop into the folded over top edge of the sweater. I pushed it far enough into the sweater so as to catch the loop when I sew along the edge with the sewing machine.

Here's how the glued in zipper looks. Give the glue some time to dry thoroughly before you sew it on the sewing machine. I usually wait about an hour before sewing.

Now, starting at the base of the sweater, sew along the cut edge of the sweater, an even distance away from the zipper. My sewing machine (though an oldie-but-goodie), has the ability to adjust the placement of the needle. I place the needle closest to the zipper when I'm doing this step. Sew all the way up to the neckline, and go over your stitches at the beginning and end of the stitching row to set them in place.

If the zipper pull gets in the way, with the needle sticking into the sweater, lift up on the pressure holder (is that it's name?) and slide the zipper pull past the needle. Continue stitching.

When you go to stitch the second side, you will want to start from the same end of the sweater that you started from on the first side. ie, start both right and left sides from the sweater bottom. The stitching pulls on the sweater as you stitch, and you will find your sweater is sewn unevenly if you don't begin your stitching at the same area on both sides of the garment.

Okay! Here's the finished zipper. All nice and neat, and pretty much HASSLE FREE. That's the part I like!

And, here's the sweater, all finished. The froggy face is a pocket. I'm going to name this sweater, "I Think I Love You, 'Cause You're So CUTE!". It's going to head out to Hello Bluebird because it's such a thick and cozy sweater, and perfect for a cold winter's Pennsylvania day. :o)
 Now, go and sew a zipper or two, and let me know how it comes out! I'm here to answer questions too, if I didn't make myself clear enough...
Also, for more felted goodness from me, I invite you to sign up for my felt class newsletter, and be among THE FIRST to know when my new online class called "Hello Felt" launches. It's going to be so creative and enjoyable! And I just don't want you to miss out on even one minute of all that crafty FUN! Please click HERE to join. And, btw....Welcome!
xx, Val